New to websites, CMS, PHP and all that stuff? Don’t want to pay for a server and domain name till you learn what that all stuff really means?
Or maybe you want to test WordPress or some other CMS on your PC, before uploading it to a production server? There is one way to “fix” all that – setup a local server directly on your PC.
A simple and flexible solution is WampServer. What that means?
W – Windows
A – Apache
M – MySQL
P – PHP
This is basically a bundle of “software” required to start a server. An interesting fact is that 90% of servers all over the world are running on Apache with PHP + MySQL. So let’s get started.
First steps of setting up a local server
Visit the official website of WampServer http://www.wampserver.com, then click the “Downloads” button. You’ll be offered to download WAMP either for 32-bit or 64-bit Windows (Microsoft labels them as x86 or x64). To find out which version you have, you can check this link Windows 32-bit or 64-bit.
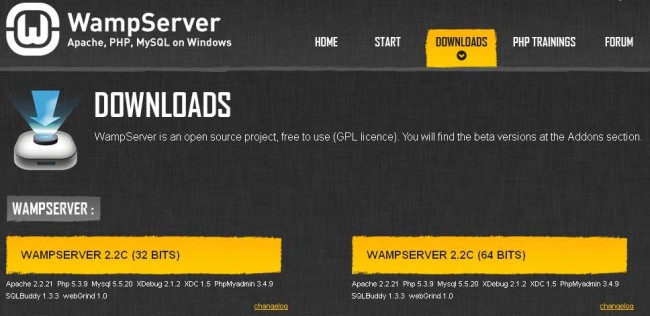
Now that you know the bit version of your Windows, you can download the correct WAMP bundle. You’ll get a pop-up window where you need to fill a lot of personal info or just click the “download it directly” link.

Start the downloaded file and run through the installation. There’s basically not much to explain there as you won’t have any options, just click Next, Next, and Next 🙂
When the installation completes you’ll get a screen to configure “PHP mail parameters” – you can leave the settings as they are, as the PHP mail function won’t work on a local server anyways. We got to the final installation screen – tick “Launch WampServer 2 now” and Finish. Voila!
You’ll notice a new icon in the tray area – a box with a green letter W in it. This means the local server is up and running now.
What’s next?
I’m reading your mind, right? 🙂 Let’s cover some basics of a local server: how to create, manage databases, “upload” files and some other useful stuff.
The first thing we should learn is where to upload files. Open the folder where you’ve installed WAMP, in my case it’s C:\wamp. There you will find the folder called www – this is the root folder of your local server – all your files should be placed there. Let’s run a small test. Create a file, name it test.php, and add the following content
Don’t forget the file should be placed inside the C:\wamp\www folder. Now open your browser and type localhost/test.php in the address bar. You should get the “Yeah, it works!” message.
You can create a sub-folder inside the www folder and place the file inside it. For example, create a folder, entitle it “test_folder” and copy the test.php file in it. Quite obviously the URL we need to specify now is localhost/test_folder/test.php
IMPORTANT: by default there’s the index.php file inside the www folder. Do NOT delete/rename/modify that file (unless you know what you’re doing, of course :))
WAMP Interface
Now what happens if we try to open localhost in our browser? We’ll get the WAMP Interface. Don’t be afraid of all the stuff you see, most of that is just general information about your local server. Like the version of Apache, PHP and MySQL, installed PHP extensions, etc

Under Tools we have two options:
- phpinfo() – if you open that, you will get full details about your server, like installed extensions, enabled/disabled functions and so on. We basically do not need that stuff at the moment
- phpmyadmin – this one will be quite important in our future tutorials. This tool allows us to create new databases and manage existing ones.
The Your Projects info block simply lists all the sub-folders that are inside the www folder. Since we previously created the “test” folder, we can see it in the list now. If you click on that, it will open localhost/test in your browser.
Creating a new database with the PHPMyAdmin tool
Open localhost/phpmyadmin in your browser. In the left panel, you will see a list of databases that already exist. What we really need is the right panel’s top menu.
- Click on the Databases tab
- Specify the name for your database in the text field labeled Create new database. For example, first_database. No other settings should be changed
- Now click the “Create” button
That’s it – you will now see that your database is available in the left panel list.
Conclusions
… and congratulations! You have setup a local server and now you have the ability to test any PHP code locally on your PC, or even install some CMS, like WordPress. Of course, it’s not a real site and no one will find your site in Google :), but WAMP is really useful for testing purposes or developing your own applications.
In the upcoming tutorial, we’ll cover WordPress installation on a local server. So stay tuned with us. You can also sign up for our newsletter to get the latest news about upcoming and published tutorials. See you!