 In this HTML Tutorial I will teach you to create Cascading Style Sheets or CSS code and apply it to web-pages. You will learn to make outstanding styles and apply it to your website text and images. Consistent use of CSS code will save you hours or even days of your time while creating websites. Besides, when you become a real master of this technique you will amaze website visitors with the power of your imagination and skills.
CSS code (Cascading Style Sheets code)
CSS code is a set of rules that defines how to use (create and apply) styles with HTML tags. There are 3 types of CSS code:
1. Embedded styles are main on your HTML page.
Style properties are described in the <style> tag at the top part of the HTML page. A style assigned to a tag is applied to all the elements (text or images) enclosed with that tag in the current HTML document.
2. Inline styles can define properties for a specific phrase, sentence, paragraph or image.
If you need to assign a unique style (the one that is used only once throughout the whole website) to an image or text, you can specify it directly in the tag this element is enclosed in. So style properties can be described in any part of your HTML page.
3.External styles are defined in a separate document.
Style properties are described in a separate file that can be connected with any HTML page with the help of the <link> tag, placed in the <head> and </head> tags .
![]() Using CSS code will save you time and efforts when editing HTML pages so that you can spend more with your loved ones or something along those lines. You can use previously created CSS files with any amount of HTML pages. If you do not use CSS code, then to change a style you must open each HTML document, find the required tag, edit it and save. CSS code allows you to edit the style only once in your CSS file and the changes will be applied to any amount of HTML pages momentarily.
Using CSS code will save you time and efforts when editing HTML pages so that you can spend more with your loved ones or something along those lines. You can use previously created CSS files with any amount of HTML pages. If you do not use CSS code, then to change a style you must open each HTML document, find the required tag, edit it and save. CSS code allows you to edit the style only once in your CSS file and the changes will be applied to any amount of HTML pages momentarily.
CSS code rules consist of selectors (HTML tags a style is created for) and descriptions (CSS code properties). In the following example, a selector is the <body> tag and a description is the style’s background property along with its value (black). So black will be the background color for the HTML page:
body {background:black;}
You can use many values in your description, they should be separated with semicolons “;”:
body {background:black;
           color:white;}
You can format the above code in any way you like:
body {background:black;
color:white;}
or
body {
      background:black;
      color:white;
}
You can also apply styles to several tags simultaneously:
body, td, h1 {background:black;
                    color:white;}
Class attribute
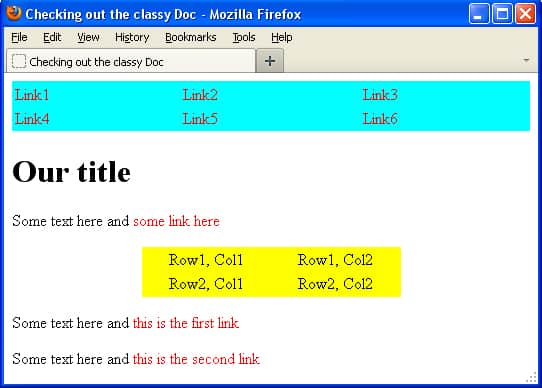
As you know, rules are meant to be broken. What if you do not want all headings of the first level in your HTML-document (set with the <h1> tag) be displayed in white color on a black background? Perhaps it is necessary that every second heading appear in blue on a white background? Attribute class is solving this problem. This attribute allows you to create specific styles for your HTML tags.
<!DOCTYPE html PUBLIC "-//W3C//DTD XHTML 1.0 Transitional//EN"
"http://www.w3.org/TR/xhtml1/DTD/xhtml1-transitional.dtd">
<html xmlns="http://w3.org/1999/xhtml" xml:lang="en" lang="en">
<head>
    <title>Checking out the classy Doc</title>
    <style type="text/css">
        table.nav {background:aqua;}
        table.rest {background:yellow; text-align:center; color:black;}
        a:link {color:red; text-decoration:none;}
    </style>
</head>
<body>
    <table width="100%">
        <tr>
            <td><a href="1.html">Link1</a></td>
            <td><a href="2.html">Link2</a></td>
            <td><a href="3.html">Link3</a></td>
        </tr>
        <tr>
            <td><a href="4.html">Link4</a></td>
            <td><a href="5.html">Link5</a></td>
            <td><a href="6.html">Link6</a></td>
        </tr>
    </table>
    <h1>Our title</h1>
    <p>Some text here and <a href="link.html">some link here</a></p>
    <table align="center" width="50%">
        <tr>
            <td>Row1, Col1</td>
            <td>Row1, Col2</td>
        </tr>
        <tr>
            <td>Row2, Col1</td>
            <td>Row2, Col2</td>
        </tr>
    </table>
    <p>Some text here and <a href="file1.html">this is the first link</a></p>
    <p>Some text here and <a href="file2.html">this is the second link</a></p>
</body>
</html>
 Please pay special attention to the class attribute that is set for the
 <table> tag.
In our case 2 styles are defined. There is a dot (.) after each table tag and after that the class name (nav or rest) is specified.
table.nav {background:aqua;}
table.rest {
            background:yellow;
            text-align:center;
            color:black;
}
We specified the class and other (like width) properties in quotes (“…”) when creating the table:
<table width="100%">
<table align="center" width="50%">
How to apply CSS code
![]() Apply external styles to set the most used styles (the ones that keep the same format for all the pages of your website). For example, it could be tags for headings and links. Then apply embedded styles to set the styles used within one HTML page only.Inline styles can be used as exceptions for the general website style.
Apply external styles to set the most used styles (the ones that keep the same format for all the pages of your website). For example, it could be tags for headings and links. Then apply embedded styles to set the styles used within one HTML page only.Inline styles can be used as exceptions for the general website style.
Embedded styles
This type of CSS code is defined at the top part of an HTML document in the <head> tag. It contains descriptions applied to the current web-page. If you need to use the same styles in other HTML documents, you can just copy this code.
<head>
<style type="text/css">
table.nav {
           background:yellow;
           text-align:center;
           color:black;
}
a:link {
        color: red;
        text-decoration:none;
}
</style>
</head>
![]() The
The <style> tag almost always contains the text="text/css" attribute. Memorize and do not forget to include it in your files.
External styles
In this case all CSS code is located in a separate file. This file is connected to all HTML documents where the specified styles should be used.
<head>
<link rel="stylesheet" href="my-styles.css" type="text/css">
</head>
my-styles.css is a separate file which contains all CSS descriptions. Please note that the type=”text/css” attribute is used in this case too. The my-styles.css file looks as follows:
table.nav {background:aqua;}
table.rest {
            background:yellow;
            text-align:center;
            color:black;
}
a:link {
        color:red;
        text-decoration:none;
}
Inline styles
In this case CSS code is applied to the HTML tags it’s defined within. For example, if you want to use the same formatting style for all first level headings, then you have to add it to all the <h1> tags of the current HTML document.
<table style="background:aqua" width="100%">
<table style="background:yellow; text-align:center; color:black" width="100%">
This method is good if you need to apply special formatting to several elements of the web-page. However you will hardly ever want to use it for many elements all over the website.
Cascade priority
First of all, the web browser is applying the CSS code that is the closest to the element. Thus the highest priority belongs to inline styles . After that embedded style is applied and finally external styles are being used.
Text formatting CSS attributes
background – defines the web-page background color;
color – defines the text color;
font-family – defines the font;
font-size – defines the font size in points (pt), pixels (px) or percents (%) in comparison to the previously defined font;
font-style – defines the font style. It could be normal (by default) or italic;
font-weight – it can be something from extra-light to extra-bold;
text-align – defines the alignment of the text: left, right, center or justify;
text-indent – specifies the indentation of the text;
text-decoration – it could be underline, overline, strikethrough or none;
line-height – defines the height between text lines in points (pt), pixels (px).
Pseudo-classes
All links are designed by default as a blue underlined text. But we can change that:
a:link – the style of the links that were not clicked so far;
a:visited – the style of the links that were clicked on;
a:active – the style of the links being clicked at the moment;
a:hover – the style of the links which are rolled over with a mouse cursor.
Lines in CSS code
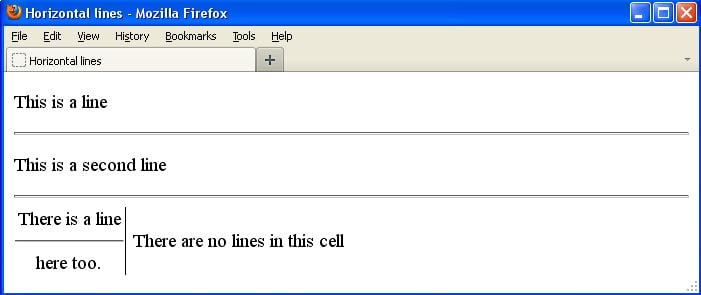
To add a line just insert the <hr /> tag. Such a line will occupy all the empty space in the row.
<!DOCTYPE html PUBLIC "-//W3C//DTD XHTML 1.0 Transitional//EN"
"http://www.w3.org/TR/xhtml1/DTD/xhtml1-transitional.dtd">
<html xmlns="http://w3.org/1999/xhtml" xml:lang="en" lang="en">
<head>
<title>Horizontal lines</title>
</head>
<style type="text/css">
td {text-align: center;}
</style>
<body>
<p>This is a line</p>
<hr />
<p>This is a second line</p>
<hr />
<table width="50%" rules=cols>
<tr>
<td>There is a line<hr />here too.</td>
<td>There are no lines in this cell</td>
</tr>
</table>
</body>
</html>
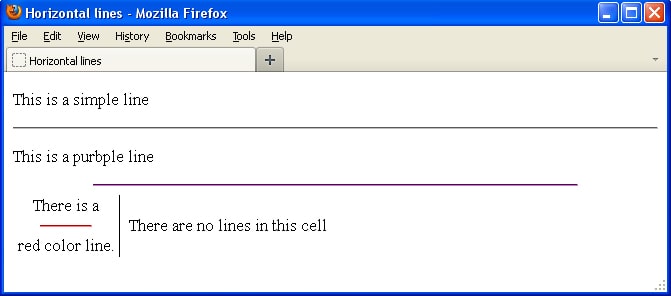
Line styles
<!DOCTYPE html PUBLIC "-//W3C//DTD XHTML 1.0 Transitional//EN"
"http://www.w3.org/TR/xhtml1/DTD/xhtml1-transitional.dtd">
<html xmlns="http://w3.org/1999/xhtml" xml:lang="en" lang="en">
<head>
<title>Horizontal lines</title>
</head>
<style type="text/css">
td {text-align: center;}
hr.red {
        color:red;
        width:50%;
}
hr.purple {
           color:purple;
           height:4;
           width:75%;
}
</style>
<body>
<p>This is a simple line</p>
<hr />
<p>This is a purbple line</p>
<hr />
<table width="50%" rules=cols>
<tr>
<td>There is a <hr />red color line.</td>
<td>There are no lines in this cell</td>
</tr
</table>
</body>
</html>
Margins in CSS
CSS code provides you with another important advantage: you can determine the boundaries appearance of all HTML elements. The width of the borders can be set in points (pt), pixels (px), centimeters (cm) or inches (in).
body {
      margin-top: 100px;
      margin-right: 100px;
      margin-bottom: 50 px;
      margin-left: 50px;
}
You can set top, right, bottom and left margins separately or together like:
body {margin: 100px 100px 50px 50px;}
HTML tags we have learned so far:
The <hr /> tag creates a horizontal line;
The <style> and </style> tags include CSS code descriptions or links to external .css documents.


