This tutorial will teach you how to add audio files to your HTML page. It could be a simple music track or a background HTML audio file. We will go through all the settings, tags, and attributes related to HTML audio and compare the default audio players in different browsers. You’ll learn about the obligatory and optional tags that you might wanna use in some cases. The bottom line is that you’ll be an online audio guru after reading the post. 🙂 So, let’s rock!
HTML audio – the <audio> tag
The <audio> tag plays and controls audio files on a web-page. The URL of an audio file can be set in the src attribute or in the <source> tag embedded within the <audio> and </audio> tags. Also, you can type your text that will be displayed in the browsers that do not support the <audio> tag within the <audio> and </audio> tags.
Some browsers support .mp3 and .aac audio formats and do not support .wav and .ogg formats and vise versa. So to make an HTML audio file play, you can convert it from one format to another (I use the Sound Forge software to do it, but there are also many free converters available on the Internet) and add both formats to your HTML code using the <source> tag:
<audio src="URL"></audio>
or
<audio>
<source src="URL">
</audio>
Attributes of the <audio> tag:
The autoplay attribute makes audio play automatically when a web-page is loaded. As a matter of fact, it’s not recommended to use the feature for better usability. The autoplay attribute cancels the preload attribute action. The autoplay attribute is OFF by default.
<audio autoplay>
</audio>
The controls attribute adds the control panel to an audio file. The control panel functions depend on your browser and may include the play, pause, rewind buttons, volume controls, etc.
<audio controls>
</audio>
The loop attribute plays an audio file from the start as soon as it ends.
<audio loop>
</audio>
The preload attribute loads the audio file at the same time the web-page is loading. This attribute is ignored if the autoplay attribute is used.
<audio preload="none | metadata | auto">
</audio>
The none attribute is set by default and it prevents the audio file from loading.
The metadata attribute tells the browser to load service information only (like running time, etc).
The auto attribute makes your audio file load simultaneously with the web-page itself.
The src attribute contains the URL of your audio file.
<audio src="URL">
</audio>
The closing </audio> tag is necessary when you are using the <audio> tag.
Let’s see a few real life examples:
<!DOCTYPE html PUBLIC "-//W3C//DTD XHTML 1.0 Transitional//EN" "http://www.w3.org/TR/xhtml1/DTD/xhtml1-transitional.dtd">
<html xmlns="http://www.w3.org/1999/xhtml">
<head>
<meta http-equiv="Content-Type" content="text/html; charset=utf-8" />
<title>HTML Audio</title>
</head>
<body>
<p>Ocean</p>
<audio controls>
<source src="http://www.your-site.com/ocean.ogg" type="audio/ogg; codecs=vorbis">
<source src="http://www.your-site.com/ocean.mp3" type="audio/mp3">
Your browser does not support the audio tag. <a href="http://www. your-site.com/ocean.mp3">Download the music</a>
</audio>
</body>
</html>
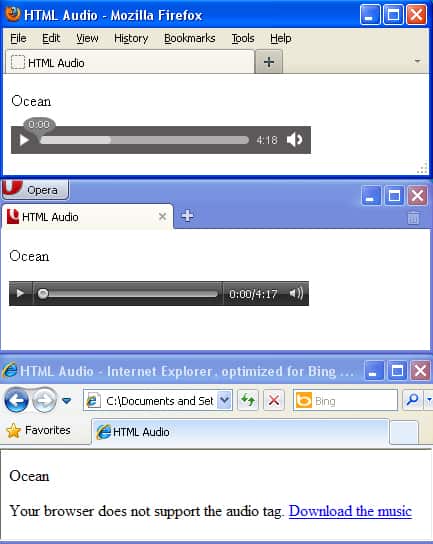
This is how Firefox, Opera, and Internet Explorer display the above code.
HTML audio – the <bgsound> tag
The <bgsound> tag defines the audio file that will play when the web-page is loaded. This tag can be specified within the <head> and </head> tags only.
The <bgsound> tag is not included in HTML specifications and if you use it your page will not be W3C valid. Plus website visitors usually do not like background music playing on a website. So be careful while using this tag. The closing </bgsound>tag is not necessary.
The <bgsound> tag attributes:
The balance attribute defines the balance between the right and the left loudspeaker.
<bgsound src="town.mid" balance="3000">
The value can be an integer from -10000 to 10000. The default number is 0. A negative number gives more volume to the left speaker and a positive one gives more volume to the right speaker.
The loop attribute defines how many times the audio file should be played.
The loop="0" code plays your audio file only once.
The loop="-1" code plays the audio file as long as the web-page is opened.
The loop="number" code plays the audio file a certain number of times.
<bgsound src="town.mid" loop="3">
The src attribute contains the URL of your audio file.
<bgsound src="URL">
The volume attribute specifies the volume the audio file should be played at.
<bgsound src="town.mid" volume="-1000">
The number could be an integer from -10000 to 0. Where 0 is maximum volume and it depends on your current operating system settings.
Also, it is possible to add a simple audio player built with Flash, PHP, and other technologies to your web-page. Alternatively you can use HTML 5 options to play HTML audio. We will definitely share this knowledge in our further HTML tutorials. So, keep an eye on our blog.
In case you have some questions or comments, please don’t hesitate to leave them below.
By the way, if you work with music notation software and you need to use audio on your site, you can use the same approach for embedding music on your site.


